The Virtual Shop (VS) is an advanced avatar creation system. The VS allows you to easily create your own unique avatar or upload a real photo. You will be able to customize all the parts of the human face: hair, eyes, nose, lips, etc and other elements which you can add like glasses, earrings, necklaces, hats etc.
The full set of Avatars is available for all the players (Free, Premium and VIP). But each type of membership has its benefits in what concerns the Virtual Shop. There is a certain discount available to various types of memberships.
The following Guide describes the full set of features of the Virtual Shop:
1. Interface

VS’s main window consists of 5 main parts:
- Left Navigation area containing 3 buttons:
· New – for creating a new avatar
· Manage Avatar - for managing your avatars
· Save - for saving changes
- Resize Object area – intended for resizing objects.
- Central area intended for avatars’ customization.
- Bottom Navigation area containing all avatar elements and accessories.
- Right Navigation area containing all the items that belong to the avatar object.
Navigation
Left Navigation

- The New button clears the central customization area and gives you the opportunity to select a new character.
- The Manage Avatar button opens the Manage Avatar window. This window contains 5 slots for saving avatars and uploaded images. This window contains buttons to perform different operations with the avatars:

- Set Default – makes the selected avatar your default avatar (displayed in User Info and in the game). The default avatar is displayed with a bluish tint.
- Load– loads the selected avatar for editing. Only avatars created with VS are editable. Uploaded images can not be edited in VS.
- Delete – deletes the selected avatar.
- Upload – allows uploading your own photos or images. Note that you can upload more than one image.
The Upload window appears (image).
Click the Browse button to select the file you would like to upload.
Click the Upload button. The image will be uploaded to a free slot. The uploaded image should be in .jpg or .gif format and not weigh more than 300 kb. The preferred image size is 70*90 pixels. Otherwise it will be automatically resized.
X – This button closes the Manage Avatars window.
Save – will save the changes you’ve made, must be used before exiting the VS..
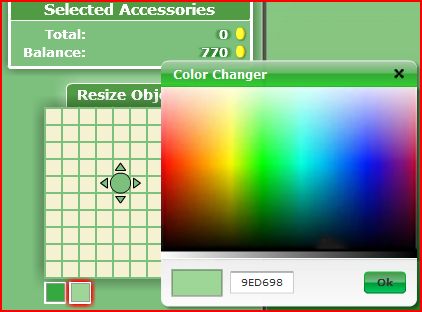
- Selected Accessories field – will display the current price of all the new accessories you’ve placed on the avatar (please note that the facial features are also counted into the full price. The field also displays your current Golden Coins balance.
- The Resize Object field is used to set your preferred size of any element you select – from nose to tattoo or trinket. Drag the circle up and down in the center of the Resize Object field to resize your element vertically; drag it right and left to resize it horizontally.

The small squares below the Resize Object indicate the colors you can modify in the selected accessory. To change the color of the element, select your element. Each element in the VS can have up to 3 colors. Click the colored button to change its color. The Color Palette will open. Select your preferred color from the Color Palette then press Ok.
Bottom and Right Navigation

On the menu to the right – you can select preset images and other groups of Avatars – which can be modified to your liking – by double clicking on any of them or drag and dropping them onto the Customization Area.
The Bottom navigation area contains two bars of elements and accessories:
The 1st - contains the groups, like lips, haircuts, glasses, beards, noses, eyebrows or backgrounds.
The 2nd contains accessories within the element groups within the 1st bar.

When you start creating a new avatar – you can select an element from the 1st bar – then choose a specific element from the 2nd bar. To add the element – just click on it once or click and drag and drop it on the Customization Area. Please note that you can only use one element from a group on a single avatar.
Bottom and Right Navigation
This is the central largest area of the VS. When the VS is opened, you will be proposed to create a new avatar or to load the existing one for editing.

To load an existing avatar click Manage Avatars.
When you select a character the chosen template is loaded to the Central Area. You can add, remove, move and resize any of the avatar’s parts. You can change the color of any avatar’s element as well.
To add an object from the right part, double click it, or drag and drop it in the center. In case there is a same item in the center and one more item of the same type is added, the first item is replaced.
To remove an object – just click on it, you can see it becomes highlighted, then either press the Del button on the keyboard or use the Delete Accessory button located on the upper right of the Customization Area.
Switching between avatars during the game
Virtual Shop offers you one more distinguished feature - Switching between your previously saved avatars during the game! If you are in a game, click on the icon with your avatar. You'll see a drop down menu with two options: User Info and Manage Avatars. Click on Manage Avatars to open the Manage Avatar window, select a saved avatar and click the Set Default button.
Good luck and have fun with the Virtual Shop!